Create a project with Classic UI (stable release)
Contents
Create a project with Classic UI (stable release)#
This chapter describes how you can create a web application using the current stable release version of Plone with Classic UI for the frontend, while having full control over its development and deployment.
See also
For other installation options, see Install.
System requirements#
Plone 6 has both hardware requirements and software prerequisites.
Hardware requirements#
The hardware requirements below give a rough estimate of the minimum hardware setup needed for a Plone server.
A single Plone installation is able to run many Plone sites.
Installation of the Plone backend and Classic UI frontend requires a minimum of 256 MB of RAM and 2GB of disk swap space.
Installation of the Volto frontend requires a minimum of 2GB of RAM.
After installation, running Plone requires a minimum of 256 MB RAM and 512 MB of disk swap space per Plone site. 2 GB or more RAM per Plone site is recommended.
Minimum 512 MB hard disk space is required. 40 GB or more hard disk space is recommended.
Warning
Add-on products and caching solutions may also increase RAM and disk swap space requirements. To avoid RAM and disk swap limitations, we recommend either temporarily resizing your remote machine to accommodate the build, or build your images locally and upload them to an image store, such as Docker Hub or GitHub Actions.
Prerequisites for installation#
An operating system that runs all the requirements mentioned. Most UNIX-based operating systems are supported, including many Linux distributions, macOS, or Windows Subsystem for Linux (WSL) on Windows. A UNIX-based operating system is recommended.
Important
Windows alone is not recommended because it does not support GNU make. If you get Plone to run on Windows alone, please feel free to document and share your process.
Python#
Installing Python is beyond the scope of this documentation. However, it is recommended to use a Python version manager, pyenv, that allows you to install multiple versions of Python on your development environment without destroying your system's Python.
Plone requires Python version 3.8, 3.9, 3.10, 3.11, or 3.12.
Make#
Make comes installed on most Linux distributions.
On macOS, you must first install Xcode, then install its command line tools.
On Windows, it is strongly recommended to Install Linux on Windows with WSL, which will include make.
Finally, it is a good idea to update your system's version of make, because some distributions, especially macOS, have an outdated version.
Use your favorite search engine or trusted online resource for how to update make.
Generate the project#
After satisfying the prerequisites, generate the project.
pipx run cookieplone backend_addon
You will be presented with a series of prompts.
You can accept the default values in square brackets ([default-option]) by hitting the Enter key, or enter your preferred values.
For ease of documentation, we will use the default values.
Tip
See the cookiecutter's README for how to Use options to avoid prompts.
Important
For Project Slug, you must not use any of the Plone core package names listed in constraints.txt.
Note that pip normalizes these names, so plone.volto and plone-volto are the same package.
% pipx run cookieplone backend_addon
╭─────────────────────────────────── cookieplone ────────────────────────────────────╮
│                                                                                    │
│                                  .xxxxxxxxxxxxxx.                                  │
│                              ;xxxxxxxxxxxxxxxxxxxxxx;                              │
│                           ;xxxxxxxxxxxxxxxxxxxxxxxxxxxx;                           │
│                         xxxxxxxxxx              xxxxxxxxxx                         │
│                       xxxxxxxx.                    .xxxxxxxx                       │
│                      xxxxxxx      xxxxxxx:            xxxxxxx                      │
│                    :xxxxxx       xxxxxxxxxx             xxxxxx:                    │
│                   :xxxxx+       xxxxxxxxxxx              +xxxxx:                   │
│                  .xxxxx.        :xxxxxxxxxx               .xxxxx.                  │
│                  xxxxx+          ;xxxxxxxx                 +xxxxx                  │
│                  xxxxx              +xx.                    xxxxx.                 │
│                 xxxxx:                      .xxxxxxxx       :xxxxx                 │
│                 xxxxx                      .xxxxxxxxxx       xxxxx                 │
│                 xxxxx                      xxxxxxxxxxx       xxxxx                 │
│                 xxxxx                      .xxxxxxxxxx       xxxxx                 │
│                 xxxxx:                      .xxxxxxxx       :xxxxx                 │
│                 .xxxxx              ;xx.       ...          xxxxx.                 │
│                  xxxxx+          :xxxxxxxx                 +xxxxx                  │
│                  .xxxxx.        :xxxxxxxxxx               .xxxxx.                  │
│                   :xxxxx+       xxxxxxxxxxx              ;xxxxx:                   │
│                    :xxxxxx       xxxxxxxxxx             xxxxxx:                    │
│                      xxxxxxx      xxxxxxx;            xxxxxxx                      │
│                       xxxxxxxx.                    .xxxxxxxx                       │
│                         xxxxxxxxxx              xxxxxxxxxx                         │
│                           ;xxxxxxxxxxxxxxxxxxxxxxxxxxxx+                           │
│                              ;xxxxxxxxxxxxxxxxxxxxxx;                              │
│                                  .xxxxxxxxxxxxxx.                                  │
│                                                                                    │
╰────────────────────────────────────────────────────────────────────────────────────╯
╭─────────────────────────────────── Plone Addon ────────────────────────────────────╮
│ Creating a new Plone Addon                                                         │
╰────────────────────────────────────────────────────────────────────────────────────╯
  [1/7] Addon Title (Addon):
  [2/7] A short description of your addon (A new addon for Plone):
  [3/7] Author (Plone Community):
  [4/7] Author E-mail (collective@plone.org):
  [5/7] GitHub Username or Organization (collective):
  [6/7] Python package name (collective.addon):
  [7/7] Support headless Plone?
    1 - Yes
    2 - No
    Choose from [1/2] (1):
 -> Initialize Git repository
╭───────────────────────────── New addon was generated ──────────────────────────────╮
│                                                                                    │
│ Addon                                                                              │
│                                                                                    │
│ Now, enter the repository run the code formatter with:                             │
│                                                                                    │
│ make format                                                                        │
│                                                                                    │
│ start coding, and push to your organization.                                       │
│                                                                                    │
│ Sorry for the convenience,                                                         │
│ The Plone Community.                                                               │
│                                                                                    │
│ https://plone.org/                                                                 │
╰────────────────────────────────────────────────────────────────────────────────────╯
Install the project#
Change to your project directory.
cd collective.addon
To install the project's dependencies, use the following command.
make install
This will take a few minutes. ☕️
When the process completes successfully, it will exit with no message.
Note
After generating a project, then running make install, if you see an error message ERROR: Failed building wheel for Pillow, then you need to install Pillow's dependencies.
brew install zlib libjpeg
apt-get zlib libjpeg
You will then need to run make install again.
See also
See also the Pillow documentation External Libraries for additional libraries that you might need.
Start Plone#
To start Plone, issue the following command.
make start
The Plone backend server starts up and emits messages to the console.
2024-09-25 16:47:15,699 INFO    [chameleon.config:39][MainThread] directory cache: /<path-to-project>/instance/var/cache.
2024-09-25 16:47:16,387 WARNING [ZODB.FileStorage:412][MainThread] Ignoring index for /<path-to-project>/instance/var/filestorage/Data.fs
2024-09-25 16:47:16,508 INFO    [plone.restapi.patches:16][MainThread] PATCH: Disabled ZPublisher.HTTPRequest.ZopeFieldStorage.VALUE_LIMIT. This enables file uploads larger than 1MB.
2024-09-25 16:47:17,018 INFO    [plone.volto:23][MainThread] Aliasing collective.folderish classes to plone.volto classes.
2024-09-25 16:47:17,760 INFO    [Zope:42][MainThread] Ready to handle requests
Starting server in PID 20912.
2024-09-25 16:47:17,772 INFO    [waitress:486][MainThread] Serving on http://[::1]:8080
2024-09-25 16:47:17,772 INFO    [waitress:486][MainThread] Serving on http://127.0.0.1:8080
You can stop the site with ctrl-c.
Create Classic UI Plone site#
While the Plone backend server is running, open a browser and visit the following URL.
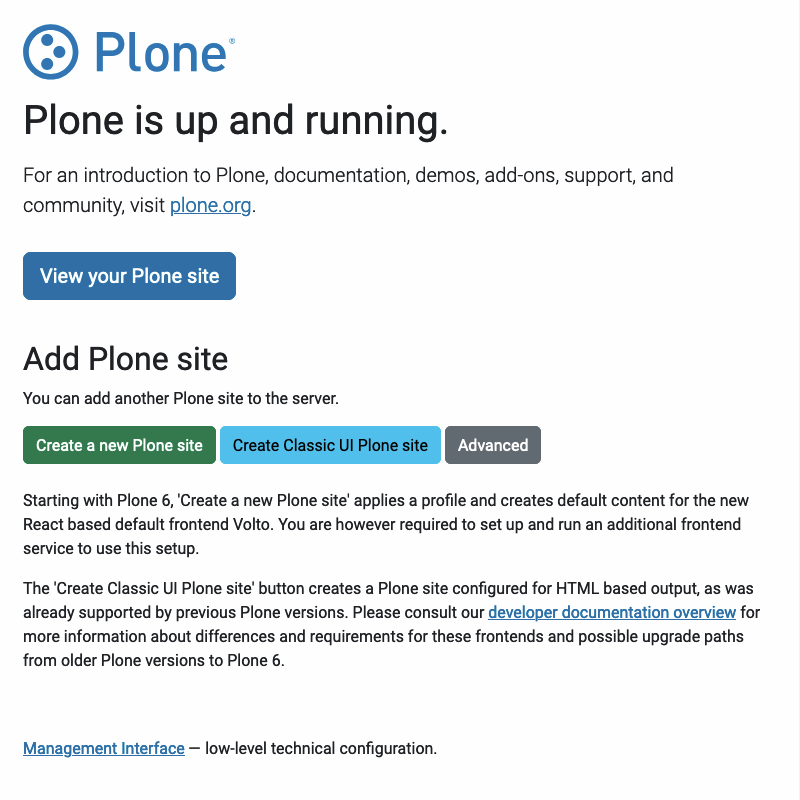
Click the button Create Classic UI Plone site to do exactly that.
Use the username and password of admin to authenticate.
You will be redirected to the Create a Plone site page.
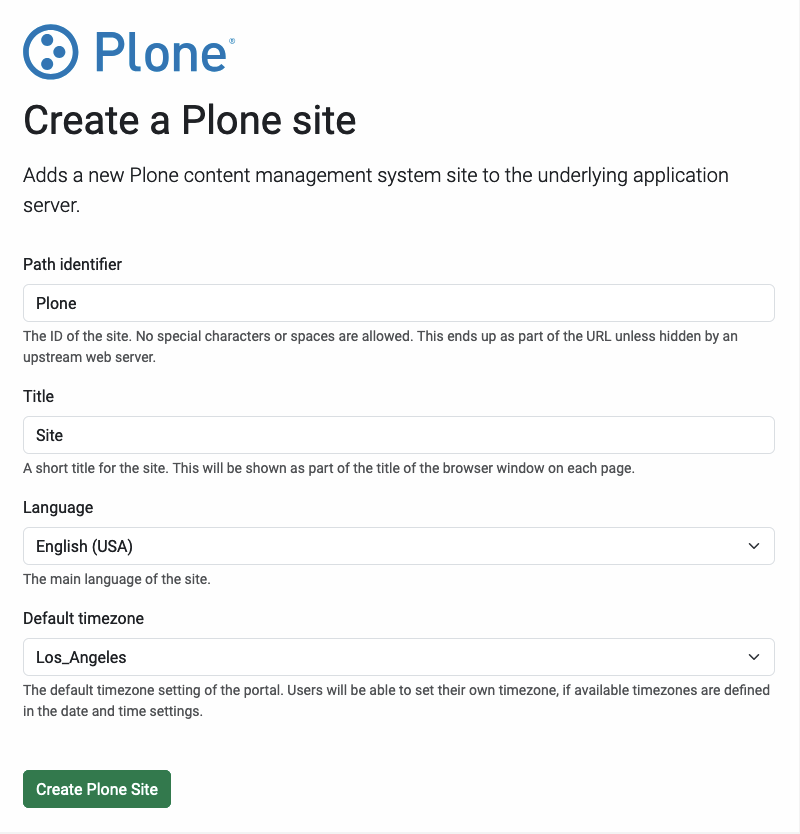
Enter values for Path identifier, Title, Language, and Default timezone. The default values are usually good.
Click the button Create Plone site.
You will be redirected to the Plone site you just created.