How to write a Slate editor plugin#
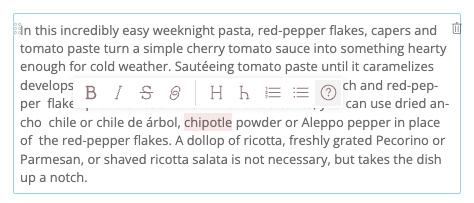
This section will guide you through writing and registering a custom plugin for the Slate editor in Volto. You will add a plugin that will provide a button to create a tooltip for a selected piece of text in a Slate editor. This process can be generalized for any custom Slate plugin.

The installer#
Start by creating a folder src/editor/plugins/TooltipPlugin containing a file named index.js, which will instantiate elementEditor.
const messages = defineMessages({
  edit: {
    id: 'Edit tooltip',
    defaultMessage: 'Edit tooltip',
  },
  delete: {
    id: 'Remove tooltip',
    defaultMessage: 'Remove tooltip',
  },
});

export default function installTooltipPlugin(config) {
  const opts = {
    title: 'Tooltip',
    pluginId: TOOLTIP,
    elementType: TOOLTIP,
    element: TooltipElement,
    isInlineElement: true,
    editSchema: TooltipEditorSchema,
    extensions: [withTooltip],
    hasValue: (formData) => !!formData,
    toolbarButtonIcon: tooltipSVG,
    messages,
  };
  const [installEditor] = makeInlineElementPlugin(opts);
  config = installEditor(config);
  return config;
}
The makeInlineElementPlugin builds the schema-based plugin Editor with the given properties.
Note
For non-schema based plugins, you can build your own set of persistentHelpers, which will render when the plugin is selected.
For an example, see slate.persistentHelpers.
View and Edit components#
Next add a React component for the element in editor/plugins/TooltipPlugin/TooltipElement.jsx.
This will serve as edit and view modes for our plugin's element.
import React from 'react';
import { Popup } from 'semantic-ui-react';

const TooltipElement = (props) => {
  const { attributes, children, element } = props;
  const { data = {} } = element;

  return (
    <Popup
      position={data.tooltip_position}
      trigger={
        <span className={'single-tooltip'} {...attributes}>
          {children}
        </span>
      }
    >
      {data.tooltip_text}
    </Popup>
  );
};

export default TooltipElement;
elementEditor schema#
The makeInlineElementPlugin takes a schema for an edit component of the element, and saves the data in the editor.
Create a file editor/plugins/TooltipPlugin/schema.js to provide the plugin's schema.
export const TooltipEditorSchema = {
  title: 'Tooltip',
  fieldsets: [
    {
      id: 'default',
      title: 'Default',
      fields: ['tooltip_position', 'tooltip_text'],
    },
  ],
  properties: {
    tooltip_position: {
      title: 'Position',
      type: 'string',
      factory: 'Choice',
      choices: [
        ['right center', 'Right'],
        ['left center', 'Left'],
      ],
    },
    tooltip_text: {
      title: 'Text',
      type: 'string',
    },
  },
  required: [],
};
Create a withTooltip extension#
Define a Tooltip element as an inline node in editor/plugins/TooltipPlugin/extensions.js.
import { TOOLTIP } from './constants';

export const withTooltip = (editor) => {
  const { normalizeNode, isInline } = editor; // we can also normalize plugin data here

  editor.isInline = (element) => {
    return element.type === TOOLTIP ? true : isInline(element);
  };

  return editor;
};
The constant TOOLTIP used throughout the plugin is defined in editor/plugins/TooltipPlugin/constants.js.
export const TOOLTIP = 'tooltip';
Volto configuration registry#
Finally register the plugin and the toolbar button in Volto's configuration registry.
import installTooltipPlugin from './editor/plugins/TooltipPlugin';
import { TOOLTIP } from './editor/plugins/TooltipPlugin/constants';

const applyConfig = (config) => {
  slate.toolbarButtons = [...(slate.toolbarButtons || []), TOOLTIP];
  slate.expandedToolbarButtons = [
    ...(slate.expandedToolbarButtons || []),
    TOOLTIP,
  ];
  config = installTooltipPlugin(config);

  return config;
}

export default applyConfig;
Style#
You may want to include some styling in editor/plugins/TooltipPlugin/index.js by importing a style sheet for the tooltip plugin.
import './tooltip.less';
Complete installer code#
The plugin installer code from above, completed with necessary imports, results in editor/plugins/TooltipPlugin/index.js:
import { defineMessages } from 'react-intl';
import { makeInlineElementPlugin } from '@plone/volto-slate/elementEditor';
import TooltipElement from './TooltipElement';
import { TooltipEditorSchema } from './schema';
import { TOOLTIP } from './constants';
import { withTooltip } from './extensions';
import tooltipSVG from '@plone/volto/icons/help.svg';

import './tooltip.less';

const messages = defineMessages({
  edit: {
    id: 'Edit tooltip',
    defaultMessage: 'Edit tooltip',
  },
  delete: {
    id: 'Remove tooltip',
    defaultMessage: 'Remove tooltip',
  },
});

export default function installTooltipPlugin(config) {
  const opts = {
    title: 'Tooltip',
    pluginId: TOOLTIP,
    elementType: TOOLTIP,
    element: TooltipElement,
    isInlineElement: true,
    editSchema: TooltipEditorSchema,
    extensions: [withTooltip],
    hasValue: (formData) => !!formData,
    toolbarButtonIcon: tooltipSVG,
    messages,
  };
  const [installEditor] = makeInlineElementPlugin(opts);
  config = installEditor(config);
  return config;
}