Portal Actions#
Actions are links or buttons that allow users to perform specific actions on your site. These actions can be anything from viewing a content item to editing a page, to accessing a specific feature of your site.
Note
Actions in Plone are provided by action providers. There are at least two providers for actions.
Portal actions, provided by the actions tool named
portal_actionsin the ZMIContent type actions defined by the Factory Type Information (FTI) of the Types Tool, and named
portal_typesin the ZMI
Here only the portal actions are described.
Portal actions are typically displayed in the site's navigation menu or toolbar and can be accessed by users with the appropriate permissions.
Portal actions are managed using the Portal Actions control panel in Plone. This control panel allows you to add, edit, and delete actions, as well as organize them into categories and control where they are available on your site.
Note
We use the terms "Portal actions" and "Actions" in this documentation to mean the same thing.
Anatomy of a Portal action#
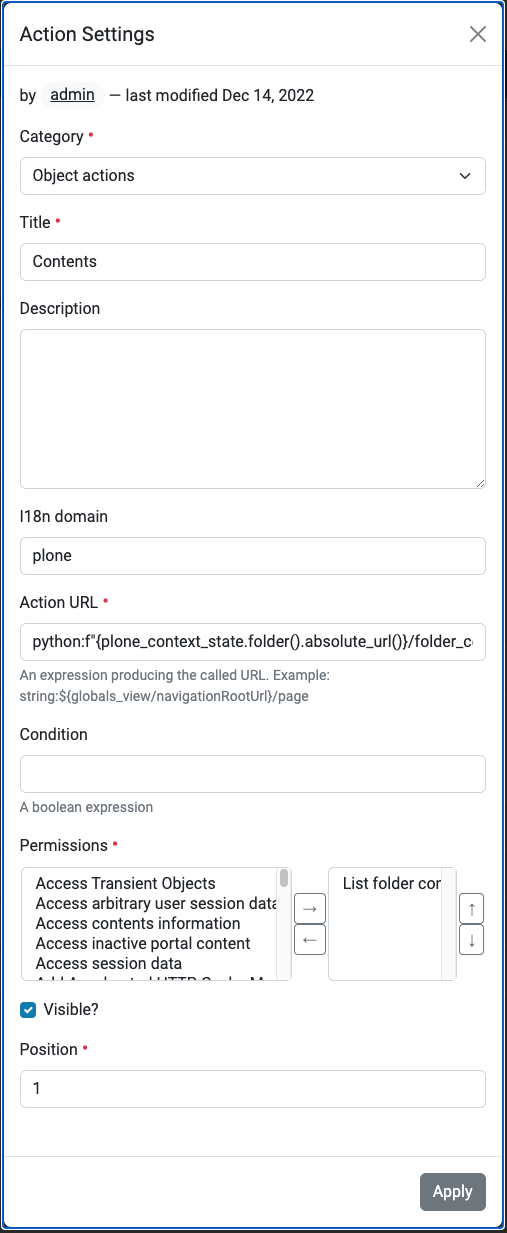
A portal action in Plone consists of a few settings, including the category, title, description, URL, and control parameters.
The action Title is the text that is displayed for the action in the site's navigation menu or toolbar. This text should be descriptive and indicate what the action does. The Description is used as an additional text shown when hovering over the link. The Title and Description can be translated using the translation system of Plone. Therefore the I18n domain can be set here.
The Action URL is the address of the page or feature that the action will access when it is clicked. This can be an internal page on your site or an external page on another website.
The Condition controls whether to show the action or not.
You can use expressions in the URL of an action to make the action more dynamic and flexible. Expressions are also used for the Condition.
The Permissions chosen also control the visibility of an action.
The Visible? setting can be used to show or hide actions. This can be handy to disable default actions or temporarily disable actions.
The Position setting is used to order actions within their category, and is numbered starting with 1.
Together, these components make up a portal action in Plone.
You can use the Portal actions control panel to manage and organize your site's actions.
Action categories#
Several action categories are used for different purposes. These categories include:
- Object Actions
Actions that are available when viewing a specific content item.
- Object Buttons
Actions that are displayed as buttons when viewing a specific content item.
- Portal Tabs
Actions that are displayed as tabs on the top of the page.
- Site Actions
Actions that are available on every page of your site.
- User Actions
Actions that are available to users when they are logged in to your site.
Each of these action categories serves a different purpose and is intended for use in specific areas of the site. For example, object actions are intended for actions that are specific to a particular content item, while site actions are intended for actions that are available on every page of your site.
Expressions#
An expression is a piece of code that is evaluated at runtime and can be used to insert dynamic values into the URL or provide the decision for the condition.
Todo
Contribute to this documentation! A chapter about expressions is missing. As soon as it exists a link to this chapter needs to be placed here. See issue Backend > missing chapter Expressions needs content.
Adding or editing portal actions#
To add or edit portal actions, you can use the Portal actions control panel. To access this, log in to your Plone site as a user with the appropriate permissions. Then select the menu item . From there, click on the Actions link in the General section. You can also select from the Site Setup or any other control panel.
Once you are on the Portal actions control panel, you will see a list of all the existing portal actions for your site. To inspect or edit an existing action's settings, click its Edit button.
To add a new action, click on the Add new action button at the top of the page. This will open a form where you can select its category and enter an arbitrary ID. Click the Add button to add the action. The new action should now appear in the actions listing under the selected category. You can now edit its settings by clicking its Edit button.
It's important to note that the ability to add or edit portal actions is only available to users with the appropriate permissions. If you do not have the necessary permissions, you will not be able to access the Portal actions control panel.
Exporting or importing portal actions#
You can export action configuration to XML using the built-in Generic Setup Tool export.
Then this XML can be imported again within a profile of an add-on package.
Place the file as actions.xml in the profile of an add-on.
You can cut out snippets from this file for creating actions.xml containing only changed or added parts.
To export all actions:
Go to Site Setup and choose Management Interface. You can also select from the Site Setup or any control panel.
Click portal_setup.
Click the tab Export.
Tick the checkbox Actions Providers.
Click the button Export selected steps at the end of the page.